Copyright 2022 IEW Solutions an ifelseWare Conpany
Monitoring & Transport Area
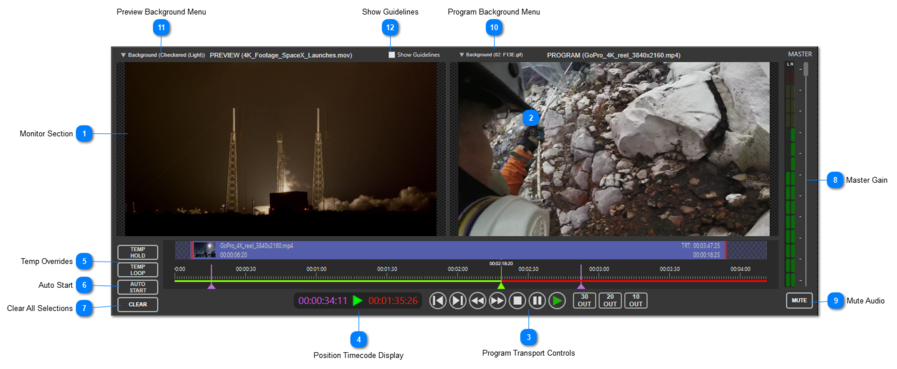
Monitor Section
Preview:
When an asset’s thumbnail control or its row in the data grid are clicked, the asset will be placed into the preview slot and wait to be taken to program. The asset’s static thumbnail image will appear in the preview monitor on the left. This provides you with a visual representation as to which asset is now standing by.
For most assets, only a static image appears, and video files can not be played exclusively in preview. However, you can still take advantage of the image to aid in adjustment of properties like geometry, effect shaders and in the testing of transition effects.
Now if the asset is a source from video capture or NDI, its live source monitor view will appear in the preview.
Program:
The program view is simply a live clone of the actual program out, showing exactly what is occurring on screen.
The actual monitor surface will appear as a black rectangle floating on a static background. Both surfaces shape themselves to reflect the aspect ratio of your configured pixel space. They also automatically resize to fit within their respective boundaries when window size and/or splitter panels are repositioned.
Tabs are used to mark significant cue points within the asset play. These cue points can aid in countdown callouts for stage direction. (Visualization is described below in “Position Timecode Display”.) They can also make it easy to navigate quickly to a specific timepoint with the Next & Previous Tab transport buttons.
Any number of tabs can be placed along the timeline. To add, simply point your mouse cursor over the timeline at approximately where you would like it to sit, then right click and a popup menu will appear.
Now select "Add Tab". Once added, you can fine tune their position by click and drag them left or right or by hovering you mouse over the pointer and using the mouse wheel.
Another way is to move the playhead to the exact position you want and then right click on the tab. This time select “Snap To Current Position”.
A new feature is to use the tab as an automatic pause command.
Now when the play head reaches this point, the asset will pause. To resume you can press the spacebar or click on the transport pause button.
To ensure that the tab cannot be inadvertently moved or edited after it has been placed, check the Lock Tab option.
You can also add a brief description of the tabs purpose by again calling up the menu and click “Edit Description”.
Simply type in what you need and click OK.
So now, if you need to remind yourself of what the tab represents, just right click on the tab and you will see your description.
For most situations this displays both elapsed time on the left and a count down time on the right. Both reflect the current playhead position minus any in and out timings So even if you trim off 5 seconds from the start, the elapsed time will always begin at zero and countdown will show zero at the out trim point no matter how much is trimmed off the end.
The countdown time on the right will always remain red in color. The left-hand display will generally appear green. However, if you have added any tags to the timeline the display color will change to purple. Also, when there are tags on the timeline, displayed time will be individual countdowns to the next tag position. Once the playhead has move past a tag it will begin counting to the next tag, and so on. If no more tags remain it will simply countdown to the end.
In between the time displays is an icon that indicates the current transport state:
In the case where you are looping an individual asset or a linked group. This icon appears:
Inside is the number of iterations that has occurred since repeat play began.
Use these to provide a onetime temporary hold at out point or continually repeat any video asset. The buttons remain disable until a video asset is finally taken to program. After the asset is playing you are free to engage either feature.
Temp Hold:
When pressed, the asset will continue but will pause and remain visible at its out trim point. The hold will remain until the stop button is pressed. Once stop is pressed, the asset will transition out and return to its starting point.
Temp Loop:
When pressed the asset will continue to its out trim point but upon reaching it, the playhead will instantly return to the start point and continuing to play. The asset will keep repeating until the stop button is pressed.
NOTE: During to loops all transition effect are canceled to keep the repeat as seamless as possible. However, when stopped the asset’s out transition effect will occur.
For both buttons, once the asset has been stopped, these buttons will become disabled again.
The master audio fader overrides the audio volume of all currently playing assets. This control cannot boost an individual asset’s level, it can only temporarily reduce it.
WARNING: Adjustments made here are not saved and should not be used when unifying levels between assets. Refer to Audio Output to learn how to properly save an asset's audio gain.
This feature is only available when output pixel spaces has been configured to span across multiple outputs. When enabled, a simple red outline will display in the preview space only and will provide accurate outlining of boundaries for each output.
Simple two output span. (3840x1080)
More unique 3 output configuration. (Top: 3840 x 1080 | Bottom: 2560x1080 centered w/ 640 px negative space on either side)
Program Background: If it helps, you can choose to also display the current program background in preview. When this option is selected, any changes to the default program background will be reflected here as well.
Checkered( 'shade' ): When tweaking alpha key values of transparent assets such as lower thirds or when setting drop shadow values, doing this on a black background leaves you guessing. So as an aid while the asset is in preview you can select a checkered tablecloth type background to help highlight transparent areas.