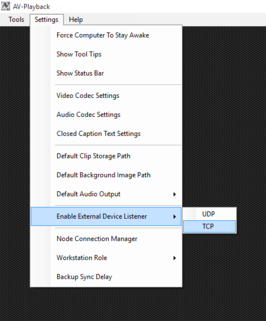
To begin communicating with AV-Playback, first open the network listening port.
Select either to communicate via TCP or UDP. By clicking on either one, AVP will begin listening on port ‘7000’ for any command strings that match the appropriate structure outlined below. Direct the transmitting device to send strings to the workstation IP containing AV-Playback. NOTE: Only one port can be open at a time. Clicking either on the currently selected network type or the other available type will close the open port and in the case that the other type was selected, that port will now open.
Control protocol is in simple ascii text strings and are not case sensitive. I do use in the following explanations a combination of upper and lowercase characters, this is purely for clean document formatting.
Every command string needs to start with the prefix “AVP”, followed by playlist index (starting from 1) surrounded on each side with the pipe character “|” .
Example: AVP|1|
Following the opening character string, proceed immediately with the command string. Some commands require an additional integer value. Separate the command name and the number value with a comma “,”.
Load clip to standby: ‘LoadClip’ + ‘,’ + ## (clip row number)
Complete example to load clip number 3 in the first playlist: AVP|1|LoadClip,3
Start playing clip: ‘Start’ + ‘,’ + ## (operational flag)
Set the operational flag to ‘-1’ to start the clip currently sitting in standby. You can also use a clips row number to take clip straight to program, bypassing the ‘LoadClip’ function. Note: There will a slight delay when taking a clip straight to program. This is due to the fact that it must still be placed into standby first before it is executed to program.
Example to play clip in standby: AVP|1|Start,-1
Example to load clip number 8 and take it straight to program: AVP|1|Start,8
Stop clip: ‘Stop’
Complete example to stop clip: AVP|1|Stop
Pause clip: ‘Pause’
Complete example to stop clip: AVP|1|Pause
Note: The pause command is a toggle, simply send the command again to resume play.
Set current position: ‘SetPosition’ + ‘,’ + *timecode
*The current position is formatted as a timecode string (‘hh:mm:ss:ff’.)
Complete example to set clip position to 30 seconds and 12 frames: AVP|1|SetPosition,00:00:30:12
Advance to time out: ‘GotoTimeOut’ + ‘,’ + ## (operational flag)
Set the operational flag using numbers 1 to 4 (1=60sec, 2=30sec, 3= 20sec, 4=10sec)
Complete example to advance to 10 seconds out: AVP|1|GotoTimeOut,4
Enable Temp Hold: ‘TmpHold’
Complete example to stop clip: AVP|1| TmpHold
Note: The command is a toggle, simply send the command again to disable.
Enable Temp Loop: ‘TmpLoop’
Complete example to stop clip: AVP|1| TmpLoop
Note: The command is a toggle, simply send the command again to disable.