This tool makes it easy to select the desired output for a given playlist.
Output Display Picker
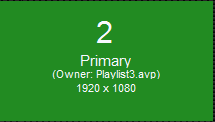
The display picker automatically draws an individual icon representing a screen destination. Only destinations that qualify as an external output will be displayed. The only one not shown is the one classified by the workstation, as the ‘Main Display’. AV-Playback will always reserve that one for its own user interface. Do not confuse this with AVP’s ‘Primary’ designation, that is simply the apps way illustrating the one that is selected.
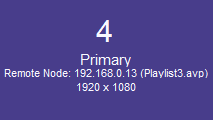
If a remote node is being employed and has been successfully connected, an additional icon representing its output will also appear. You can assign the playlist to this output as if it was it were a local destination. Lean more about the differences, refer to Understanding Workstation Roles.
It is important to remember that AV-Playback is designed to be used event presentations and must have a separate remote screen available for it to operate as a video player.
NOTE: An additional video output is not necessary when using as an audio only type player.
To make a selection simply click once on the desired output with the left mouse button.
As illustrated the icon’s background color will turn color from gray to green if it is a local destination, or blue if it is a remote node destination. In either case, the word “Primary” as well as the owning playlist’s title will become displayed.
NOTE: Only one screen can be selected at a time. To span across multiple outputs, you will need either an external device such a Data Path or if your system’s display device driver support it, you can map the outputs together to obtain one large destination pixel space. In either case Windows must see the combined outputs as one display.
Click this to save the necessary selections. Once this is done, a sequence of events will occur... First the window will close then the playlist will close but then immediately reopen using the newly selected outputs. It would be wise no not perform these steps while a clip is playing in program.
NOTE: This button will only become enabled once a legitimate audio device output has been selected.